Exploring Dimension

0

Fiber Art Fusion’s Exploring Dimension exhibit opens tomorrow at The Art Place in Marietta, GA. The reception is 7 – 9pm. I will have my piece The Price of Passage there.

I went to the hanging party yesterday — and it is a stunning exhibit. Margaret Betz and Rebecca Reasons have done an excellent job curating and hanging. Most of the artists in the show routinely work with the quilt as a flat surface. It is fun to see how everyone pushed themselves to create dimensional pieces using fabric. I feel honored to be included with such a talented group of artists.

The Price of Passage

2

When my art group, Fiber Art Fusion, started talking about making our annual exhibit based on dimensional pieces, I was really excited — but I had no idea what I was going to do. Most ideas came & went, discarded for not being unique enough — and the one idea that stuck was to do a hanging bridge. Most all of my work is flat on the wall — but this would be sculptural using fabric as the primary medium.

So where have I been lately? Working frantically on this. I had most of the summer to think about the project, but very little time to actually work on it, and the exhibit is being hung on the first of next month.

But, thank goodness, I am finally done. It spoke to me today — and said that that was it — add no more.
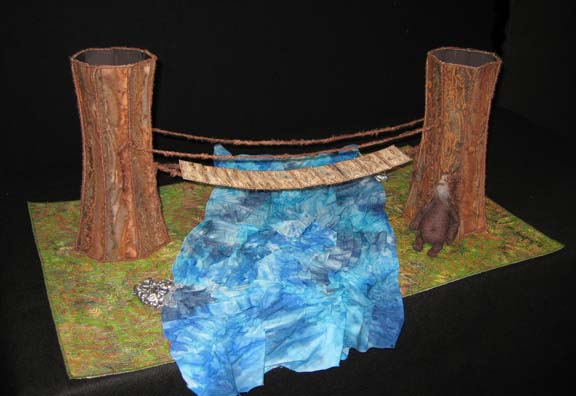
priceofpassage

It is called The Price of Passage because of the bridge troll. How can you have a proper bridge in the middle of the forest without a troll — and of course, he’s going to expect payment for you to cross it.

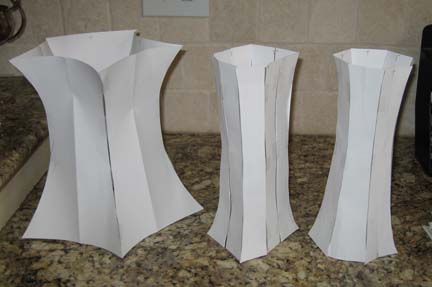
I started with the trees. Our group had a great brain storming session with Sharon Ahmed in which she encouraged us to cut up paper and tape it together to come up with unusual shapes. I have also seen Terry Grant do the same thing when she is developing a pattern for a dimensional fabric teapot. At the end of school, I salvaged a sketch book of heavy white paper — most of it unused — and started cutting and taping. It took some time to figure out the size and the repetition of the pieces in order to get a nice round look.
wip1

The first one on the left is my first attempt. Its diameter was too large and even though the paper was folded in the middle, helping to give a nice curve, I knew that wouldn’t translate to Peltex. For the 2nd tree, in the middle, I cut up the left & right halves — and the whole thing looked square. Adding one extra piece was a good idea — but didn’t really fix the problem enough. So for the 3rd tree (3rd times the charm), I drew the pattern with a left & right side & taped 7 of them together to give me a nice round shape. Voila — I had a pattern.

Then I cut out a side from the tree to make a template — fused fabric to both sides of Peltex — and then cut out the template from the Peltex. I wished I hadn’t done that so quickly. I then had to go back & add a fluffy brown yarn to cover the Peltex on the edges. It is much easier to mark the pattern on the fabric, sew the yarn onto the Peltex on that line, then cut it out & cover the edge with more thread. It gives you much better corners. I didn’t do that on the trees — but did remember to do that for the slats on the bridge.

Once I had 14 pieces, I started sewing them wrong sides together with a tight zigzag. This gave me a nice hinge that I think adds to the character of the trees — and it allowed me to sew them together by machine. I also added more fluffy yarn to the edges on the top & bottom of the trees before the final edge seam was sewn to give a cohesive look.

Then I made the bridge slats. They were done like the trees — with a minor change. I fused fabric to one side of the Peltex (which will be the back of the slats), marked the slats with a permanent marker, and then sewed on an O ring to the 2 short sides (thus saving me from sewing through Peltex by hand). Then I fused fabric to the front side of the Peltex and sewed a simple straight line — following the marked lines on the back side — so that I could see where to add the string on the front (I used a brown crochet thread) — which I added with a tight zigzag. The slats could then be cut out and the edges zigzagged with more thread.

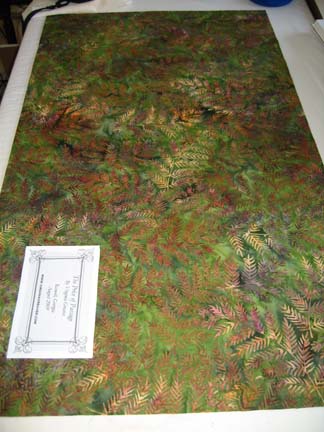
Despite my eagerness, I realized at this point that the actual bridge had to be the last thing added. Again, I used a base of Peltex & fabric. By adding the back fabric first, I could sew on the finishing label by machine — and then fuse the fabric to the top.
wip3

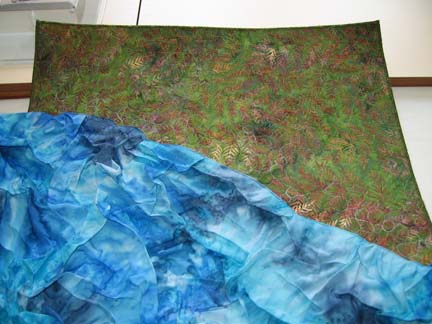
Then I took a great mottled blue hand-dyed fabric, covered the back with fusible, scrunched it up, and fused it on the base with lots of wrinkles left on top.
wip5

Then the base had to be quilted. Choosing quilting can be difficult, so I turned to my notebook and starting playing with ideas. (I’m a great fan of Dijanne Cevaal and am a big follower of her quilting techniques — guess it shows.)
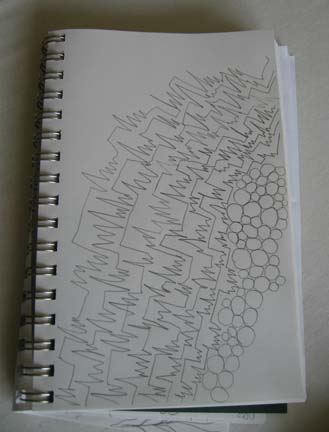
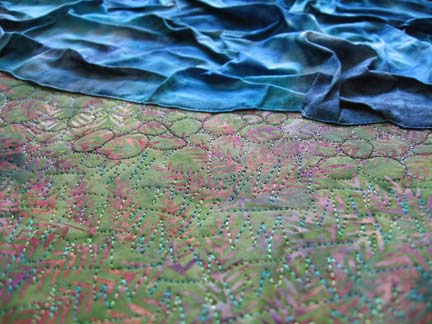
wip4

wip6

I don’t have a picture of it, but I used a metallic thread for the waves in the water. It was VERY challenging. I used a 100 Topstitch and really low tension — but it was difficult to keep the metallic thread from breaking when I was free motion quilting through Peltex and four layers of fused fabric.

Then I had to add the trees. No hope at this point but to sew them on by hand. I taped them down so they wouldn’t wiggle too much. I put on one of those sticky “thimble” sheets on my middle finger, but the needle kept puncturing it — and my finger. Then I had to wait & heal a few days.
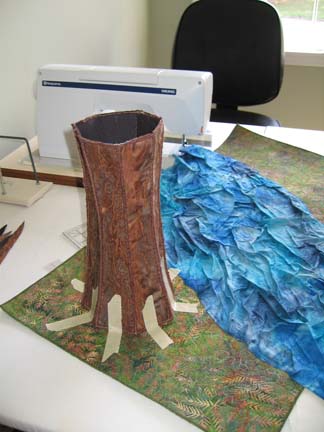
wip7

When the pain subsided, I added some metallic silver tulle and Tyvek that I had bubble melted and painted pewter.

My final addition before the bridge was the troll. I had been thinking about him all along, and in his first incarnation, he was wired (which was new to me) — but I had to discard him because he was out of scale for the piece. I don’t have a lot of experience making dolls, but after having spent some time reading Susanna Oroyan’s book Anatomy of a Doll, I knew that I couldn’t make too complicated a doll in the size that it needed to be in order to fit the rest of the piece. He also couldn’t be pretty — which was a strange thing for me. As artists, I think most of us try to make our work appealing, but a troll shouldn’t be too appealing. I drew out a main shape which included the legs, a different pattern for the arms, and a side view pattern of the head so that I could give him a nose and chin. He is my first attempt at needle sculpting a doll. He has beads for eyes, perle cotton thread details, gray wool felted on for the beard, and brown eyelash yarn for the hair.
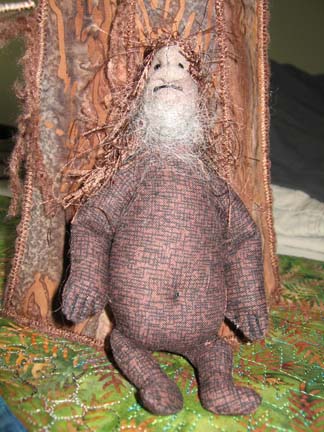
troll

I would have liked him to have been wired and had more detailed hands, but he is very small and for me, it made more since to hinge him with a sewn line for the elbows, legs, and fingers.

The bridge was last. I strung 2 rows of fluffy brown yarn (same used on the trees) through the O rings on the back of the slats. I also added O rings on the side of each tree. Then I tied the string to each O ring — which sounds easy — but getting the tension just right was challenging. Too much pull on one side or the other, and the slats would twist or dip. Once it was done, I had to have handrails, so I added more O rings to the trees & more yarn tied to each end.

The Exploring Dimension Exhibit will be held at The Art Place in Marietta, GA  this September 2009.

Happy Dance

3

For non-quilters, doing the happy dance seems like an odd sounding activity — it just means that we are trying to share our happiness after succeeding in an endeavor, usually entry into a juried quilt show. In my case, I am sharing the love today because I want to share the good news that arrived in the mail this afternoon.

Both of my entries, Adelpho and Unconditional, have been accepted into the International Quilt Association’s World of Beauty exhibition to be held in Houston, TX in October. It is a high honor to have been juried into this show as it is one of the largest international quilt shows — and I am in excellent company.

I am glad that I persisted in entering this show. It took many years of wiping my pride aside after receiving rejections. I have had 3 other quilts there. Nothing last year — but I wasn’t surprised. I just entered one quilt and it wasn’t very good. I made it during my pre-move period and the stress showed in my work. But 2 the year before — and 1 the year before that.

I think my work has changed a lot since the first quilt. I’m still doing portraits, but it’s not monochromatic anymore, and there is more detail in the features. Working in a series has been wonderful and I’ve learned a lot. I never thought that I would work in a series, but there are so many lessons in each piece that progress and show in the next piece.

New Art Doll

0

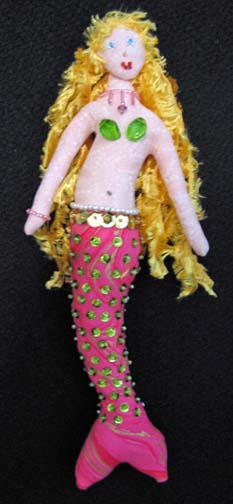
I haven’t made an art doll in a couple of years. I made several in ’07 to sell at an art fair and I still have a few in my studio that my youngest still loves to show off to her friends. She typically tells them that she can “have one” — just pick one out — and they usually pick Sophie, my first doll. Well, I usually explain very nicely that that isn’t going to happen — and that Sophie isn’t going anywhere since she was my first doll. I tend to be fairly territorial over them because — even though they look like a child’s toy — they are ART dolls and they take some time to make.

Technically, they are mermaids. I haven’t ventured into legs — but I’ve been reading Susanna Oroyan’s Anatomy of a Doll, and I’m beginning to think that anything is possible. I suppose that anything new is scary, but she breaks it down into steps so that it doesn’t seem so overwhelming.

I did break my rule and make a mermaid for the daughter of a friend of mine. She has been the queen bee of the house for a long time, and now she has a new baby in the house that is getting a lot of attention. I had intended to have this doll finished for her before the baby came — but the baby was a couple of weeks early. C’est la vie. But she is ready now. My daughters each picked out a doll for themselves a couple of years ago — although only one took it to her room to keep. I did find it in a toy bin once and reconfiscated it, but she has recently reclaimed it. I have always retained rights to put the dolls back in the studio if they aren’t properly taken care of. But this one, Elisabeth, is on her own. Hopefully, she will help teach her owner that art dolls and babies are fragile and need to be specially cared for.

Elisabeth

Zentangle Mandala

7

I have been doodling a lot in my drawing notebook with a Sharpie — and it finally occurred to me that I was doing a short version of what is called zentangling. I saw a post about it recently on QuiltArt and was directed to www.zentangle.com. They don’t describe it so much as show you. I started researching and found several videos on YouTube about it — but I am surprised to find that there is currently no Wikipedia entry for zentangle or zentangling.

OK — so what is it? It is a process of doodling that brings about a meditative state. You use heavy white paper and thick & thin black markers — although I’ve seen someone online use black paper with a white marker. If you’ve read Drawing on the Right Side of the Brain — the author talks about reaching the meditative state in drawing that is needed to tap into your best creative energies. Zentangling is an easy way to do this.

So I went to Dick Blick the other day & bought some 80 lb. bright white drawing paper and a couple of Sharpies. That is really all you need — and some time. I had to sit by the pool for a couple of hours yesterday — and it was a perfect activity to keep me occupied. There is a lot of detail in each piece so it takes quite a while to fill one out — but it is also a lot of fun. It seems to take away the pressure of the blank page and lets you experiment with drawing in a non-threatening way.

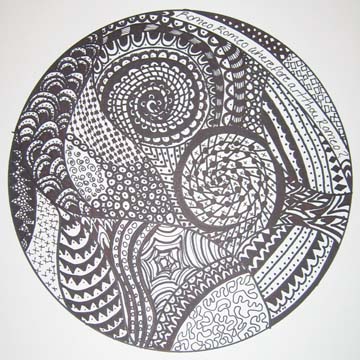
My first piece is around a circle — so it is technically a mandala — which also helps with the meditation. I had several people who saw it tell me that they would love to see it silk screened onto T-shirts. I’ll have to ask someone if you can create a screen from a Sharpie drawing.

2009-06-01-002_2

I used a plate to draw my circle — and then used wavy lines to divide it into sections that I then filled with circles, dots, lines, squares, diamonds, whatever. It uses repeating patterns to give a sense of rhythm. It is not dissimilar to the process of coming up with quilting patterns to cover background areas.

Fending Off Insanity

3

For the past 3 weeks or so, I have not had a major project. I fnished my last portrait & vowed not to start anything else big. A couple of summers ago, I spent the time staring at a half finished portrait that beckoned to me from the studio — and then strangely, when the summer was over & I had time to spend on it, the muse was almost gone. I had practically finished it in my head and didn’t want to work on it any more. It is nice when you can work with the muse and ride it through a project — and hell when you missed the journey. I suppose I could just lay the work aside and start something new, but I learned from my mom that a professional artist works through blocks.

So I have been having a hard time. Last summer, I laid everything aside. This summer it has not been so easy. The first couple of weeks, I made small things. I made 5 cell phone pouches — I love mine. Made one for me, my mom, my 2 daughters, and my best friend.

Then I saw a great article in the magazine Altered Clothing. Someone had made a bustier using the Chanin style. Chanin is a native Alabamian, like me, and she has a bunch of women in Florence that hand-stitch things like Tshirts and pillows that she sells in New York boutiques. I liked the bustier, but I’m not really the type — I’m more of a T-shirt gal — and I’ve seen Chanin’s work online so I knew that it was just a matter of a few simple materials and some time.

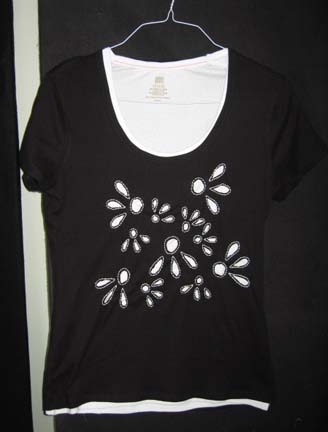
I bought a black & a white shirt from Wal-Mart. I layered the white shirt under the black shirt & then basted them together at the neck & the bottom hem so that the white shirt would peek out. I decided to keep the design simple & traced circles & teardrops onto the front. I used up all of the white DMC floss that I had (years ago I used to cross-stitch) and then bought more — and stitched on the lines with a backstitch. Then I cut out the black just inside the stitch lines leaving the white to peek out from underneath.

I want to say that this is Nigerian applique — but I think that that isn’t technically correct because I don’t turn under the raw edges. Because it was knit jersey, I felt comfortable that it would be OK left alone. When I washed it, I turned the shirt inside out. It came out of the wash fine.

2009-05-26-019_1

Great shirt for little $. I think I’ll make a few of these to wear this summer.

And then yesterday, when I thought that my brain would explode, I pulled out my small drawing pad and a black Sharpie. I realized that I needed to drop the pencil — stop with the hesitation & erasing — and just go. I doodled about 4 pages worth — and it made me feel a lot better.

I think I’m going to start going through drawing tutorials on youtube in the mornings when my kids have swim practice. My muse seems stronger this summer, and bottling her up isn’t going to work — so I’m going to come up with things we can do poolside.

At the End

8

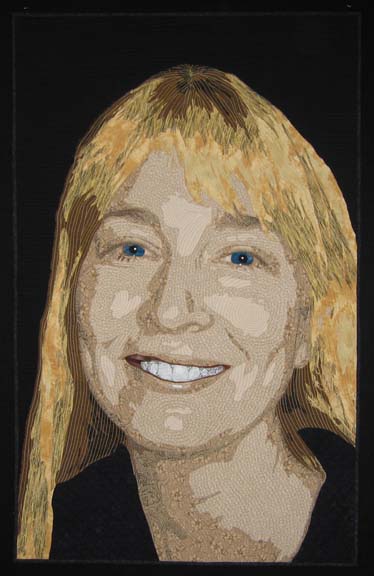
Here I am at the end. I have completed my last quilt and will not start a new one for months. It is a very strange feeling compounded by the fact that I still have 2 weeks before the kids are home for the summer and I have jury duty tomorrow.

I have posted her on my website HERE, but this is a small showing:

ginny

It’s working title is Adelpho (which means brother in Greek). I found Ginny at church when we moved, and I’ve always called her my doppelganger — although that seems to imply that one of us is evil, and I hope that isn’t the case. She does have my same name, however, which in my experience used to be fairly unusual, so I’ve felt a kinship with her since we met. Given her theological experience, it seemed fitting that the name for the piece be Greek. I may still change it.

Everyone Should Know

0

Everyone should know how easy it is to see how your Congressional representatives are voting because they are supposed to be supporting you, the voter. Congress.org will email you key votes as well as notify you about upcoming votes. It’s easy & takes 30 seconds or less to sign up. There aren’t any excuses anymore.

http://www.congress.org/congressorg/megavote/

No matter how you vote — left or right — be informed.

Mother’s Day Gift

2

I have been in the final stages of my last big project before I kick off for the summer. My kids are home in the summer and they spend endless hours by the pool, so I use that time to read and hardly have any studio time — so I try to finish my work before school ends. My last quilt is currently blocked — I think it is dry — and I’m going to go photograph it in a few minutes.

That leaves me with almost 3 weeks — not as much as you would think since there is a lot of extra stuff going on right now — to do small projects. One of those is a gift for my mom. I decided to make her a cell phone pouch that she can move from purse to purse — and I found a great pattern at Susan Brubaker Knapp’s site HERE.

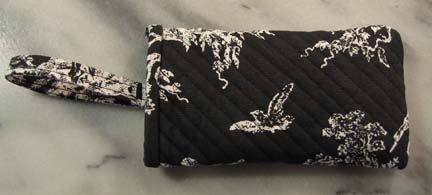
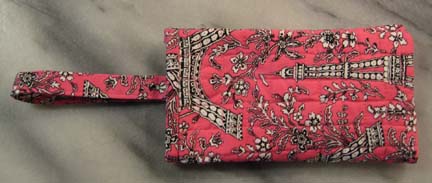
The first one I made for myself. Selfish, I know, but it gives me the chance to try out the pattern & make mistakes on the first one. I could have used more artsy fabric, but really, I just want something that will slip in my black bag and not stand out — so I used a reverse black & white toile I had on hand. For mom’s, I used a pink eiffel tower toile that I used for a purse I made for her a couple of years ago. It isn’t her every day purse, but it will match & that appealed to me.

2009-05-05-0012009-05-05-003

I thought when I made them that I needed to extend the strap — from 4″ to 8″ — but really, once you add the caribeener clip, 8″ is too long — so after I took these pictures, I went back & adjusted the strap back down to 4″.

I mailed mom’s off this morning. I hope she likes it. I love mine.

Countdown to Summer

0

During the summer, I do not have time to produce much work, so I try to finish up all of my large projects before the end of May.

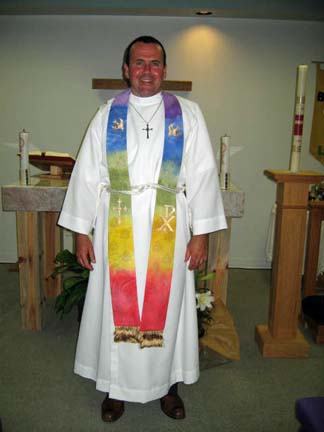
The stole that I gave to Jonathan was well received and helped to brighten our Easter service. It reminds me of a stained glass window, which is nice since we don’t have one in our current building.

2009-04-20-007_1

(You can read more about this stole on my website HERE.)

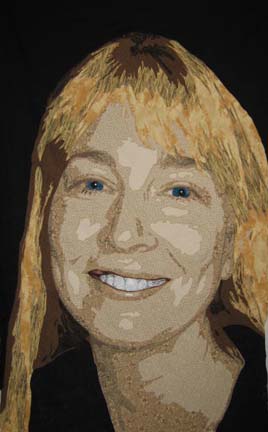
The portrait that I am working on is ready to sandwich and prepare for quilting. I finished the applique work in time to put it on my design wall & show my mother who visited last week. I realized then that I could easily change her eyes — add some color and thus some realism. I did it this morning, very easily. (My mom is an oil painter and I always benefit from her critiques. I wished she lived closer.)

2009-04-20-001_1

Go to Top