Design
Design

Quilting Lincoln
0I spent a long time quilting this piece. I took about a week to quilt his figure — but then I needed to do something for the background. I found that incorporating two different ideas gave me something workable without being overwhelming.
Like many people quilting on a domestic machine — I found some angles to be very challenging. My first design was a parallel flowing line which wasn’t too hard — but then I added swirls in the open spaces. These had to be done all in the same direction — so the left hand side of the quilt became a bear to manage. I found that rolling up the right hand side and holding it with rubber bands at the top and bottom gave me something to hold on to.
From this angle, you can see the background quilting better. I am so glad I took the time to add this texture to the piece. I think it adds to the feeling of age in it — and it’s a nice contrast to the contour lines on the face.
I think I’m slowing getting better at quilting. Although I’m not a huge proponent of the quilt police guidelines that the stitch length has to be perfectly consistent — and I do not have the luxury of a stitch regulator on my machine — over time, that is what is happening. I did not mark my design and chose instead to keep the framework of wavy lines organic — but even those became more uniform the more time I spent making them.
After a week of background quilting, I finally completed Lincoln. When I sat down to write my artist’s statement, I found it entirely too political, so I decided to merely include some of Lincoln’s quotes instead.
It feels good to finish before the holidays. I already have ideas for my next piece.

Choosing Faces With Character
1At some point, as a portrait artist, you begin to want to do something different. Most faces aren’t as distinctive as you would think and the thought of working on a face with a lot of character becomes appealing.
Couple that with the recent election and my need to study American history, and I came up with the idea of working on a piece portraying Abraham Lincoln — our 16th President.
This is the very beginning — the first two values that show a rough outline of his face and ear.
Adding the third value makes his face almost immediately begin to come to life. (I was obviously starting this late in the day when the natural light in my studio was failing.)
The fourth value begins to show us the deep wrinkles that Lincoln had in his later years.
The fifth value is very subtle but shows some distinction from the fourth one.
It is at about this time that I realized, given the size of my pressing sheet that I’m using (sometimes I’ll fuse directly to muslin but this time decided to use the Teflon sheet), I am going to have to wait to finish the darker values in his ear and neck. (My sheet is 18″x18″ — I have my eye on one that is 27″x30″.) Otherwise, I would be fusing fabrics onto my ironing board — and that would just make a mess.
This is the sixth value. I am really pushing the envelope having this many values but I think it will work in the end.
This is the seventh value with the gray blue of the irises added.
And the eighth value is black. It adds that finishing touch of contrast. It highlights his eyes, his nose, his mouth, and his chin. I have also added the spark of white in his eyes.
This shows him with a completed ear. (You might not be able to see it here, but I’ve moved the pressing sheet over so that it is directly under the ear.)
There is actually a piece of black from his hair that will flow into the darkest part of his ear. I decided to add it all as one piece — so you’ll see that final detail after his hair is attached.
And then I started on his neck. (Again, I moved the pressing sheet down into the neck area.) I thought about only showing it completed, but I think it is equally interesting to see its creation in layers. This is the first value (which is actually the 2nd value in his face.)
The second value gives a little more definition.
The third value shows us his Adam’s apple.
The fourth value accentuates that.
The fifth value begins to give us shadow.
The sixth value completes the shadow.
And the black again gives the contrast, showing the outline of his jaw and the separation of his neck from the face.
The previous pictures were all taken while the piece was lying flat on my ironing board so there is some perspective distortion. This is the completed face on my design wall.
I may change his eyes to make them darker — but all in all, I think he is looking fairly good.
My daughter asked me the other day if I was going to put his stovepipe top hat on him. Although his hat is iconic, I can’t say that that had occurred to me — so I may put off working on his hair while I consider the design of the overall piece. As usual, I have not decided what to do in the background yet either.

Working With Color
2Working with color can be very confusing — almost as difficult as working with values.
Since my last blog post, my figure was complete, but she needed a space in which to inhabit. She is holding up an iris on the back of her hand — so in adding color to the piece, I have a wonderful deep purple to add to the green in her eyes.
I also decided to pull the green down into the sliver of her shirt that is just peeking out from the towel draped around her shoulders.
And then this is where things got interesting. At this point, I had not added color to her mouth. I was ignoring that for the time being and trying to decide on a good color for the stripes in her towel to alternate with white. The actual photograph was a pink — but that didn’t seem to add to the piece for me. It seemed too close in color to purple.
According to the color wheel, if you have purple and green — then you need orange — so I went headlong into orange for the towel. I also added color to her mouth in rusty orange tones. I tried pinks and reds in the mouth and they all ended up looking like lipstick — so I went with something closer to browns.
It’s not that the orange in the towel is wrong — but it is too much. You no longer look directly into her beautiful green eyes. I kept this on my design wall for a while. It just didn’t look right to me.
So I switched to this cooler color of blue. Now you see her eyes first and the piece is in greater harmony. I still have the orange in her mouth to go with the purple and green. I think this composition of color works much better.
I did make two other adjustments. The water is a smoky blue with hints of purple so the iris melted into it. All I had to do was add a small border of a lighter value around the iris where it touched the water fabric. Now it stands out.
I also darkened the light spot on her nose just a little. It was too bright before and didn’t look natural.
Why did I choose what I did for the water and sky? I didn’t want anything overly complicated to compete with the figure and her engaging gaze so I originally planned to have just one fabric in the background. I had nothing in my stash and the only thing that I found in the fabric stores was the smoky batik. I decided that the pattern gave the impression of reflections on water and would be great. In reality, it overwhelmed the piece. I used a sky piece that I had on hand for the top part.
Strictly speaking, I should have used the rule of thirds when deciding on the horizon line, but I broke that rule. I liked it much better when the horizon line brought the viewer’s eye across to the bottom of the figure’s eye.
Her eyes are what is important in this piece, and visual cues like color and line bring up the supporting cast in the overall design.

Green Eyes
1Now that we’ve covered drafting, it’s time to move on to my favorite part — cutting the fabric.
Using the back side of the pattern — the reverse — trace shapes with a Sharpie onto Wonder Under and fuse to the back of fabric. Then cut out shapes, peel off the paper, and fuse to the muslin using the vinyl overlay as a guide to where to place the shapes.
This shows the first three values in the face of my newest piece. I know — not much to look at yet.
But just adding the next layer gives us an idea of the outline of her face.
Then the fifth value shows us the rest of the face. Obviously the light sources comes from the left side — so the right hand side of her face is in shadow.
The sixth value shows us more of her personality.
Wow! And those eyes. I have added a seventh value — not much — just a little — but it adds a little more pop. I have exaggerated the outline of her eyes — it makes then read well at a distance.
At this point, I’m leaving her mouth alone. I experimented with adding some color but it detracted from the focal point of her eyes. I may just need something closer in color to her skin tone. I’ve set that aside for now.
And then I started on her hair. She’s a brunette, but I’ve learned from experience to start much lighter for highlights. Using the yellow bin and the brown bin, I can get a great range of values.
This shows the first two values in her hair.
And this shows her third value. It does worry me a little at this point — whether the end result be brunette — because this looks really blonde.
I start adding in the fourth value — which goes into brown — to the left of her part.
But then of course I realize I need to start working to the right of her part.
And of course I’ve forgotten her blonde values in the lower section of her hair below her chin.
I then go back and start filling in with the fourth value.
This is the Wonder-Under’ed fabric for value 5. It’s really intricate. I wonder if I’m a glutton for punishment. I have to remember — I have to cut this out — and I’ll eventually have to sew it.
But doesn’t it look good on.
My final value is black — which is a great way to end a value range and pull one last value out of the stack.
I think she definitely reads as a brunette — and the blonde highlights give her a range that makes her face pop. And those eyes! I think they turned out well — if I do say so myself.

Running Through Mud
3One of the hardest things for me is trying to contain my creativity during the summer. I typically am not able to accomplish anything — although I usually take on some projects that are more pool or kid friendly.
But this year was going to be different. My children are older — I reasoned. I would have some time — at least, I though so — until I adopted a puppy.
I’ve been house training her — but I’ve had to spend a lot of time outside — and I can’t get much of anything done outside — although I did drag out a folding table one day and use it for some drafting.
My Fiber Art Fusion group has a show coming up in September — the theme is Artifacts. I really struggled with this one. I don’t like to work in themes — I think it takes away from inspiration — but in fact, over the last couple of years, it has pushed me to do things that I otherwise wouldn’t have done — which has created growth in my work.
I was really confused about how to integrate the theme of Artifacts into my work. I make portraits and I want to continue with that body of work. And then it occurred to me — I have a large collection of men’s ties.
I first used them in pinwheel blocks around my first portrait — Ama. After that, I made many pinwheel pillows as gifts and on commission. I found that even unappealing ties — ones from the seventies with strange colors and polyester material — when used with a lot of other ties and placed on black — can look really rich. So when someone in the family passes, I typically ask for the tie collection. I also have many from my husband and I have bought them at yard sales and thrift stores.
So I decided to try to use ties to make a portrait. I had no idea if it could be done. I haven’t seen it done before — but I think that if you use the right values, you can collage just about anything into a recognizable form.
Ties are tricky to work with though. After my first selection of a color palette, I began to realize that the sheen of some of them affected their value. Working with cotton all the time, I wasn’t prepared for that. So I took a lot of trips to a local thrift shop.
I couldn’t find a white tie — although I tried hard. I finally decided to use a white lining fabric that I had in my stash. Its pattern is reminiscent of a tie pattern. The yellow gold that comes after it is the lightest tie I could find. I suppose that men need ties that will hide stains — although this one very clearly has a lipstick stain which I left to emphasize the character of the materials I’m using.
It’s when I went to my next value that I began to realize I had another problem. Below is the drafting of the wonder under– and there is no way that that is going to fit on one tie without it being broken up. I had to develop a system for cutting the wonder under in some places & putting it back together with overlap.
There was practically nothing left of this tie when I was done.
Reassembled, it isn’t so terribly obvious that I had to make some splits.
However, the next value not only required that the pattern be split but I also needed more fabric than was available on one tie. The one on the right was my original tie — the one on the left is one I found to go with it.
As you can see, I used up most of the large spaces on both of these ties.
I think the only obvious demarcation is along the forehead but I think that it will become less of an issue as the rest of the layers are added.
This shows the fourth layer. Again, there were two ties used with a similar pattern.
And this shows the final value.
I still need to add detail for the eyes and the mouth. I’m not certain I can use only ties for the eyes — and I know I’ll have to use cottons for the whites and grays needed in the mouth. But I’m happy with what I’ve been able to do thus far.

Quilting Conundrum
0I don’t tend to show a lot of my quilting on my blog. I don’t know that I consider myself all that competent at it — there are certainly better machine quilters out there — and I’m not a master at feathers and curlicues. I tend to either follow the contours of a shape or use abstract designs that add texture to the shapes. Also, I have worked on a frame before — and now I use just a home machine and my hands. Quilting is a more difficult proposition at this level than when the quilt is stretched out on a frame that the machine hovers over.
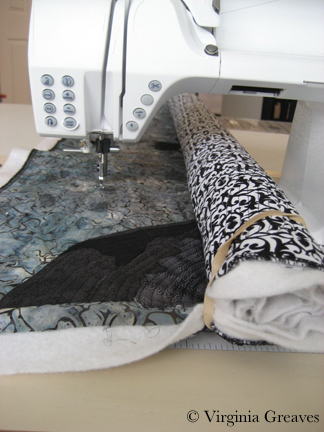
But making a complex piece like this creates some problems for quilting on a home machine without a frame — and since I’ve made a few mistakes of my own, I thought I would walk through the steps that I used on this quilt to address issues before they became problems.
Everyone is told by the quilt police that you quilt from the inside out. So you start in the middle of the quilt, and any ripples that form as you go along get pushed out. This is particularly a problem with dense quilting. I quilt about 1/4″ apart — and even though I use a 70/30 cotton/poly batting with a scrim to keep it from stretching — it still happens.
If you have more than one figure in your piece, however, you are working from more than one focal point. I typically quilt the face first, then the hair, then the clothing, and finally the background. With two figures, as I found in Beach Guardians, you can end up with a lot of fabric left to distribute in the space between the two figures if you aren’t careful.
I started by taking the black and white picture of my design and drawing on it with pencil. It does look a little spooky — but it gives me a plan of how I want my quilting lines to go.
Since I haven’t quilted in a while, I pulled out my erasable blue pen (it comes out with water) and marked my beginning lines. It gives me confidence when I feel unsure about starting. This is the first figure’s face completely quilted.
And this is the second figure’s face completely quilted. When I was done with her face, I then quilted her scarf, then her jacket within the line of the purse strap, and then the rest of the jacket. I did her hair last.
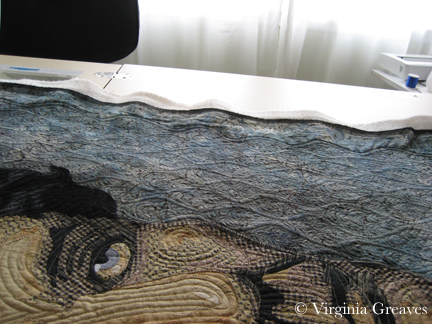
The picture below is to give a reference point. I’ve done both faces — as well as the entirety of the figure on the left. I would normally want to work on one thing at a time — all of the jacket — all of the water — but I have to split it up for this to work. At this point, I need to worry about the space between their faces and make sure that I can distribute the fabric as evenly over the space between the faces as I can.
This is a closeup of the water and cityscape between the two heads. I used metallic threads for the water and jagged black lines — avoiding the white lights — for the cityscape.
I then quilted the left side of the hair of the figure on the right. It seems elementary — but trust me — there is method in the madness. I suppose I could have taken it farther & not quilted the face of the person on the right until after this stage — but old habits die hard and I really want to concentrate on the faces first since they are the focal points of the piece.
Below the hair is the left side of the jacket — which came next.
Then I moved to the right to quilt her shirt.
And then her collar on the right hand side.
At this point, instead of working on the rest of the jacket, I switched over to the right side of the hair. I used long wavy lines to show the texture in her hair.
Then below her hair — still on the right hand side — I quilted the lines of her jacket.
If you look at the top of the picture above, there is a small piece showing the fingers on the shoulder of the jacket. Again, I used my erasable pen to make a few guidelines before I started.
The only part left on this figure is the hat. I tried to take one picture of the hat, but because most of it is white and the inside of the brim is dark blue, I couldn’t take one picture that successfully showed the quilting lines on both sides.
This, then, is the white part of the hat.
And this shows the inside of the brim.
At this point, I’m left with the background on the right and left sides. I work on the water on the right hand side first — using metallic threads in a wavy line. I used a traveling stitch at the top. At first, I thought I should cover that with a solid line at the top — and finally decided that it looked more realistic like this. I like the traveling lines as they are — so I left them as they are.
Then I completed the water on the left side of the piece.
Staying on the left side, I then quilted the small section showing the concrete railing that the figures are leaning against. This is just below the water.
And then I had to think about the cityscape above the water. This area on the right side is full of white lights but otherwise signifies buildings going up a cliff. I chose a jagged line in black thread — avoiding the white lines and thus making them even more prominent.
The left side is the same — except for the stone arches which I worked on in rust colors.
The only thing left at this point was the sky. I used a gray purple in the purple areas and a dark blue in the blue areas — and used a water puddle design. The thread matches so well that it is really hard to show it well in a picture. Trust me — it works. It covers the area without distraction — the quilting stitches create the harmony that is felt in the bleeding colors of the sky.
My point is that quilting can be a puzzle. Quilting from the inside out is a good rule of thumb, but when you have multiple complex structures to quilt, you need to logically consider how they relate to each other and how you’re going to address fullness created in the quilting process.
After quilting, it’s time to add the binding. Maybe I’ll document that one day — but not today. I used my signature black on the binding and a busy black & white print on the back with a matching sleeve. I don’t usually enjoy handwork, but the handwork on this piece coincided with some needed stress relief — and I was glad to have it to work on.
Then I had to soak it. I use a clear glue in the binding to help me get it into place perfectly (thank you Sharon Schamber) so I have to soak it in water to disintegrate the glue as much as possible. I filled my washing machine with cold water (warm water or even soap could set the erasable blue pen marks permanently so be careful) and left the top open so it wouldn’t spin. Then I folded the quilt with the top facing outward — and this time, I put a dye magnet sheet on each of their mouths. If you remember, on my last quilt, the red in the mouth bled onto other white parts of the quilt — never to come out. I wasn’t taking a chance this time. I laid it in the water, making sure all of it soaked well — taking care to keep the mouth from touching anything other than the dye magnets. After about an hour, I let the machine take it through a slow spin to wring out the excess water.
When I pulled it out — no crocking of color this time. I’ll have to remember that trick next time.
And then I laid it out on one of my design walls. This one has started to bend from the water that seeps into it when I block on it. In my previous home, I could pin right into the rug — but I have looped carpet now so I don’t have that luxury. I keep this wall for blocking — another for photographing. I didn’t realize at first that the water was warping the Celotex — it really messes up photographs. It took me a while to realize it was a warp in the board.
One final note — how I did I decide how much sky to add? I spent quite a bit of time thinking about that. I think that most people would cut the line just above the heads and consider the sky empty space without design details. However, it is much better that the horizon line (which I see as the median line of the tops of the cityscape) fall at 2/3rds — which brings the golden ratio into the composition. I end up with quite a bit more sky in the piece, but even though it isn’t full of appliqué details, it brings an overall harmony to the piece that it wouldn’t otherwise have.
I’m still working on a name for this piece — I’ll post a page for it when I’ve made a decision.

A Walk in Twilight
1Some time has passed since my last blog entry. Although I try to write regularly, I think my posts are more dramatic when they offer a progression of a work in progress. I also tend to be drawn into the creative process, and although I take pictures along the way, writing uses a different part of the brain, and once I get rolling, I don’t want to stop and write on the blog. Writing is a different kind of pleasure — each to be savored in their own time.
My last post discussed my Dog Portrait workshop at the Gwinnett Quilter’s Guild. Two members sent me pictures of their finished work. I think they did an excellent job bringing my sweet Solomon to life.
Both of them worked in brown tones. I had the students bring 3 values — and then they added black & white — from which comes a most convincing portrayal of our deceased Brittany Spaniel.
Once I had finished working with the guild, I came home to my current work in progress. In my last update, I showed both figures on the design wall. Keep in mind that although they were photographed on white, they were only pieces pinned on the wall — their heads, their torsos, and in the case of the figure on the right — her hair.
This is also a mock-up of the pieces. You can see that when I started the red jacket, I chose three values that work — but not together. Sadly, the lightest value is just too pink.
I took the jacket piece and ripped the pink off the back — and then found a rusty orange that works better I think. It’s more subtle.
And then I started working on the second figure’s t-shirt and jacket. Here you see the original t-shirt. It doesn’t work at all. The original photograph shows a medium gray value t-shirt with a light gray sweater on top. The lighter color on bottom doesn’t look right — and the ruffles of the sweater don’t translate.
I first changed the colors from blue to blue gray — and then simplified the lines of the shirt, taking out references to the sweater. Then I added the jacket. This picture also shows her with her hat finally on her head.
I wanted to point out that I changed the teeth on the first figure. When I stood back from the piece, it looked to me like she had braces. When I went back to look at the pattern, I had forgotten to add the piece for the bottom row of teeth.
With all of the pieces for the two figures, I could begin to assemble them. I laid down my white muslin with the plastic overlay and positioned the first figure’s head. I did realize at this point that I would have to take off the overlay. If I fused everything down and then tried to appliqué it, pieces would start coming off everywhere. If I was going to appliqué in sections, the overlay would get in the way. So after fusing a section — in this case, the first head — I took off the overlay and appliquéd it down. This meant that I had to be very careful with using the overlay in the succeeding sections. In fact, when I first laid down the red jacket, I had to rip off the scarf and relay it because the jacket didn’t line up correctly with the scarf.
I did want to point out that — given the complexity of the piece — and given that I was appliquéing in between sections — the white muslin developed some wrinkles on the back side. I decided it didn’t really matter as long as the top layer is flat. The wrinkles should nestle into the batting and not be an issue.
This is both of the figures appliquéd with no background. It was startling to see it with the white background knowing that I would be working them into a night scene. With a white background, the white hat really doesn’t look right.
The sky was a difficult piece of fabric to find but it works well to convey the feel of the sky after the sun has set.
The background is really another design that has to enhance the figures. It is definitely different than what I’ve done before. There are two blacks in this center detail — one represents the water and the other represents the shadow of buildings with lights. (I wish the photograph showed the difference — but c’est la vie.)
This next picture shows the edge of the wall that the figures are standing in front of — then the water — and then a Roman arch with the city in the very background. I took a chance using the rust orange in the lit up arch but I think it works.
And then this shows the completed water and skyline of buildings on the right.
And that is the final composition. This afternoon I pinned it to ready it for quilting.
Does it work from a color standpoint? The hot colors are on the left, the cool colors are on the right, and the mixture falls into the sky. Is there enough tension created by using complementary colors?

It Takes Two to Tango
2Sometimes, it can be difficult to get on the computer in my house. I have been continuing to work and take a lot of pictures, but I can’t always get on my blog to share them. I’ll start with some catching up.
In my current piece — I have finished my first face and started on my second face. I tend to start with the faces and build the rest of the piece around them. I’ll explain that more when I start adding pieces around the faces.
These are the first two values in my second face.
This particular person has Autumn coloring so I went back to my wonderful orange beige paisley. This is a risky fabric to use but I love the movement it gives to the face.
Then the darker shadows begin to show more of the outline in the face.
I have started adding dark around the eyes to give them more depth.
Once the eyes have been added, the outlining is a subtle difference — but an important one.
The irises of the eyes are a dark green — although not quite as dark as this picture shows. The true color of the eyes are a light green — but then the contrast would be lost and the eyes wouldn’t be as engaging.
Once I’ve added the mouth, you can see more of her personality. Like the first figure, she also shows some gum in her mouth — and I’ve added the same experiment as before.
This is what she looks like on my design wall before I’ve added her hair. Her hair is much more complex than the last figure. She has long tresses down the right and left sides — and then a cap over the top. (Notice the color shift my camera made from a white background to a black one — the tones in the face look more gray now.)
This shows the first three values of her hair on the left side of her face. She has a lot of blond in her hair, although the deeper tones go into brown.
This is the completed left side.
The right side is more flowing — and with only three values, the pieces won’t fuse together as one large piece yet.
The darker values bring it all together though.
This is what they begin to look like on my design wall. The second figure still needs her hat but I’m putting off adding it because its color will affect the rest of the piece — and I want more elements added before I decide what to use. Her hair also drapes over her jacket which will be more obvious once those pieces have been added.
I wanted to point out that I’ve complicated my process. In order to create more complex pieces, I have one very large vinyl overlay — and many small ones. I use the small ones to tape onto my fusing sheet and create the smaller pieces. I can then assemble them back together under the large overlay.
Also, I have returned to a white piece of muslin for my base. Because the background of this piece will be dark, the faces need something light underneath them. A dark fabric underneath them would change the color of the fabrics on top.
I have also starting adding a watermark to my images. I don’t care for watermarks — but with the advent of Pinterest, many images of my blog have started floating free. Although many kind souls give attribution, there are still instances in which it goes unmarked. Promotion is always welcome, but for a visual artist, lack of attribution can be quite damaging. It’s also important for the servers to which my pictures are copied to have some idea of the original copyright holder. So I have turned to watermarks. Interestingly, I can find no quick way to add a watermark to all pictures already existing on a WordPress blog (the latest version) — that works. I tremble at the thought of adding them all manually.

New Duet
4Once I finished Beach Guardians and tackled all of its problems, I started designing my next piece. I had several photographs that I liked, and I learned how to use clipping masks in Photoshop to take pieces from each one and put them together into a pleasing design.
This is another duet — a couple friends of mine. Neither of them read my blog so maybe I’ll get to surprise them with the final piece. I was tempted to show one of them my in progress yesterday — but I decided it was best to hold it back. I’ve found that there are only a couple of people I’m willing to show my in progress work to (well, other than my blog) — and sometimes even that doesn’t go well. Constructive criticism is always good — but sometimes when they can’t see where I’m going, the comments are not helpful.
I wanted to point out again the difficulty of angles when using a fusible. I could have sketched out what I wanted, cut off the excess, and then ironed it down — but sometimes that just leaves stretched out fabric that won’t sit down once the fusible is removed. So when I have something unusual — like this — I leave the excess, but I only fuse down the parts I need. (No use wasting fabric.)
Then I can go back and cut away the excess fusible. The end result is a piece that will lay flat when I take off the fusible.
This is what the first two layers look like. You can already see her smiling lines and a fairly good outline of her face.
Portraits always start to come alive with the darker shades though.
This is the fourth value.
And this is the fifth value — just a couple of places — and I’ve started to work on the eyes. I’ve been adding darker layers around the eyes lately to make them have more depth.
I’ve also decided that it makes a lot more sense to add that dot of white in the eye with a paintbrush rather than cutting out a tiny piece.
I took some liberties with her mouth. I’m not sold on it — I may change her teeth. I also gave her some really red lips. And gums — haven’t done that before. It was interesting trying to find fabric in my stash that would work for those things. I may lighten the red in her lips — I haven’t decided yet. (Most reds don’t work for the mouth — they have to be a rust red which can be hard to find in a range of values.) I also added the whitest white of her teeth with paint again.
And then there was just her hair to do. Hers is really easy hair — slicked back. I used all browns and the dark black — but found the lightest shade in my orange drawer.
This is her on my black design board. I put her up there to study while I work on the next face.

Lemonade
2Sometimes you don’t end up with what you expected. Sometimes the world throws you a curve ball. And sometimes that curve ball hits the middle of your quilt.
I finished my latest quilt over a week ago. I put it in water to dissolve the water soluble glue I use in the binding and to prepare the quilt for blocking. I do not use any soap because I always worry about the blue marking pen coming back through the layers and becoming permanent.
After soaking it for an hour or so, I spun out the excess water and blocked it out with pins onto a design board.
When I went to photograph it a couple of days later, I realized that I had a problem. I always prewash my fabrics when they come home — with synthrapol — or blue Dawn dishwashing detergent which has synthrapol in it (very small amount because it’s concentrated) — in order to take out any excess dye. So it always surprises me when I have a fabric crock. That is one reason I throw in a Dye Catcher sheet when I soak a quilt at the end.
But there it was — the red of the mouth had bled into the teeth — and for good measure, also left a mark at the top of the head.
I washed the quilt again — soaking the mouth & other area with Shout. I also added Borax in the tub. Didn’t work. I applied Shout & Borax again — no change.
So I blocked it again to dry but then did nothing for several days. I considered adding a few swatches of white onto the teeth & sewing them down. If I use a MonoPoly in the bobbin, it’s virtually undetectable in the final quilt. But then someone suggested I use paint. I have fabric paint — I’ve taken classes in which I’ve played with it — but I’ve hardly ever used it in my work — certainly never for damage control.
But it was a good idea.
This is what the teeth looked like before the paint.
And this is what it looks like after. I only whitened the very top portion. The original was not a pure white — it had a little gray in it. I stuck with pure white. I also didn’t touch the patterned fabric in the lower section of teeth. Although the red hint isn’t ideal, we can chalk it up to shadowing. We certainly don’t want it to stand out as much as the lightest shade — it’s best left alone to recede.
This is the top of the head. Missed this entirely when I blocked the quilt. I’m sure it came from the quilt being folded over in the wash tub and this is just the section that was touching the mouth in the water.
And this is what it looks like after being painted. I used the white but mixed in just the barest amount of yellow since the fabric was a very light cream.
Improvement at least. Sometimes, when you only have lemons, you just have to make lemonade — and move forward.