Drawing is a scary subject for many people and everyone wants an easy answer for coming up with a pattern. Typically, when I get into the technical aspects of drafting, people’s eyes glaze over. It is a process best enjoyed by someone that can stand spending a lot of time sorting through details.
I use Photoshop Elements. I am not an expert in Photoshop, but I know how to use it for my purposes. If you want to learn Photoshop, I recommend classes. I took mine online at Eclectic Academy & LVSOnline. If you have the CS version and know how to make it dance in circles — then good for you.
Some people say that I take my work from pictures — as if there are no artistic decisions that are being made. RARELY do I find a photograph that gives me everything I need. The truth of the matter is that a picture only gives you a guideline. You can put the picture in black & white & posterize it — but there is almost always a lot of scattering of values and details lost in the posterizing that you need to give dimension to your piece. Taking out color and working with value is your STARTING point. But there are always people in the art community that want to criticize the process.
Whatever. Let the critics be . . . well, you know.
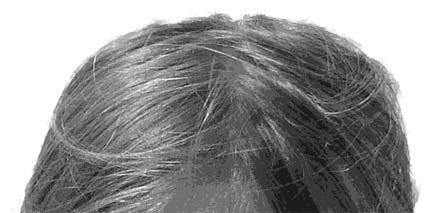
Here is a good example:
This is a posterized picture in black and white. The values are too scattered to work with. We are doing applique with closed shapes — not painting — so we have to make decisions about how to create closed shapes that still give us the feeling of the hair without creating endless shapes for us to recreate. Remember, we can still use the textures in the fabrics to help us.
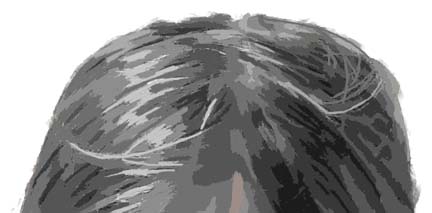
And this is the same image of hair cleaned up with closed shapes. It still gives us the general feel of the hair but in a different way.
I typically start with a color picture I pull into Photoshop. I use layers. They are essential for me to capture restore and comparison points. From the original picture, I copy it to another layer and if I intend to use another background, I delete the background using the Magic Extractor. Then I copy that to another layer and adjust the lighting if I need to. Then I copy that to another layer and make it black and white — only values now, no color. Then I copy that to another layer and posterize it. This is the point at which I’ll keep it or toss it. I can go back to my lighting layer and make changes, deleting layers above it — trying to make it work — but I do need some help in sculpting the face. For instance, I had a picture of a one year old that I was reviewing yesterday. Unfortunately, no matter what I did, there were only two values in the face. (Babies have such round faces that they don’t have the personality curves we see in older children and adults.)
And then I copy that layer again to another layer that I will clean up, draw on, erase, and do whatever I please to make my pattern as realistic as I can.
A good example are the eyes. A picture rarely gives you usable information on the eyes — but we can look at an anatomy book and study the structure of the eyes and know what should be there.
This gives us the shape of the eyes but not much else. We know there is sclera & iris in there — as well as that pinpoint of light reflecting back at us.
This is what they look like cleaned up. The eyebrows have been defined and the eyes are visible. Forgot to add the sclera — the whites of the eyes.
Much better.
Don’t be afraid to draw. You have an eraser — or in my case, an UNDO button. If I make a mistake, I hit Cmd-Z and it’s history.


